Beltane Waning Flower Moon
A new feature on ancientrails, the ancient trail of bee-keeping. This diary will serve as my record of work with my colonies and a way to review the year’s learnings and prepare for next year.


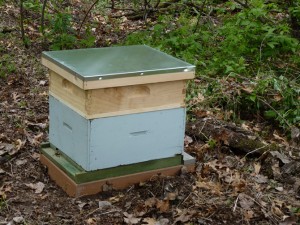
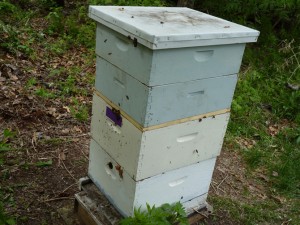
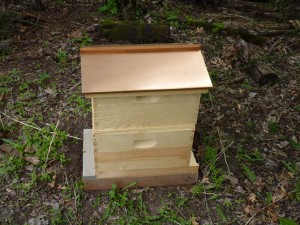
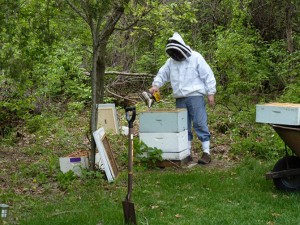
From left to right is colony 1, the parent colony of bees started with a package a year ago. The parent colony has two honey supers on it now, the gray boxes, and a queen excluder which you can see as an unpainted strip of wood between the honey supers and the top hive box. The bottom hive box sits on a bottom board which rests on a leveled foundation, in this case bricks. Colony 2, with the silvery metal cover, is the hive box, painted gray, and an empty honey super covering a plastic pail of 1 to 1 sugar syrup. The green board underneath is the bottom board and the foundation in this and the next instance are a heavy plastic decking plank cut into small pieces. Colony 2 was the third hive box on the parent which I divided a week ago and to which I introduced a new Minnesota Hygienic Queen on Monday. The third box, with the copper top, which all the colonies will have eventually, is the colony started a two weeks ago from a 2 pound package of Minnesota Hygienics. In the final frame I’m smoking the top hive box of the parent colony preparatory to an inspection of the frames. Kate took this picture last Monday and the other pictures were taken on May 1.
Today I started by preparing the smoker, the metal object you can see in the picture with me. This has taken a long time for me to learn and I finally have found a way to  keep it working for the 30-45 minutes I need to do my inspections and whatever work I need to do. I now use hamster
 bedding to start the fire, throw in some compressed wood pellets, pumping the bellows to create a flame and embers. Then I put in smoker fuel, a cotton product that I assume is leftover material from spinning cotton into thread. Once this has established itself I put on the suit, zip up the headpiece, cinch up the sleeves and put my pants into my socks. I learned this last one the hard way when that bee crawled up my pant leg and stung me on the butt.
Each time you start work on a colony you smoke the entrance, which is to the back in the colony 1 photo and to the right side in 2 & 3. Then, each you time you lift something, like the top or a hive box you put smoke under the object you’re lifting before you take it completely off. The smoke calms the bees and, it just occurred to me, the beekeeper. Often when you crack a hive box you have to use a hive tool to break the propolis the bees use to seal up their hive. It’s a sticky, brownish substance that sets to a somewhat pliable but sturdy joiner.
Each time you check the hives you look for several different things: swarm cells, which are really new queen cells indicating that a swarm is imminent, larvae which mean the current queen is at work and present–this is a situation bee-keepers call being queen right, disease, this one is tough for me since I’m not sure what I’m looking for and pest invasions like mice or ants. In addition to this general inspection there are also specific tasks related to each inspection since the goal is to disturb the hive as little as necessary while maintaining a good weather eye.
Today
Colony 1 (the parent colony with a year old queen): I checked the honey supers to see if they were full. They weren’t. Had they been I would have added two more. I also removed the queen excluder and checked a couple of frames in the top hive box and underneath it for swarm cells. After setting the top box on the ground, I did a similar inspection of the bottom hive box, then reversed the two by putting the top box on the bottom board and the bottom box on top of it. Queen excluder. Honey supers. Top board. Hive box cover. Done.
I noticed pancake shaped cells constructed on top of the cells on the frame foundation. I have no idea what this means. I saw a few swarm cells and what looked like a large number of drones, fat bodied male bees. I also found larvae which meant colony 1 is still queen right. You can kill the queen during an inspection. That’s a buzz kill. Ha. If a colony is not queen right, it will not produce worker bees or honey. This is one of the reasons you stay out of the hives as much as possible. In addition, the bees know much more about being bees than you do. Let them handle it.
Colony 2 (child of the parent with a few weeks old queen): There was pancake shaped cell structures in this colony, too. Again? I did see larvae here and an empty queen cage, so colony 2 is queen right. It looked to me like a lot of these guys were drones, too, but what do I know at this point? There were a lot of bees and they did look and sound crowded–a lot of buzzing–so I added a hive box with ten frames and foundations, left the original hive body on the bottom board and put the empty on top. Then I closed colony 2.
Colony 3 (package with few weeks old queen): I lifted the copper hive cover, found the syrup pail still had plenty of syrup, smoked the hive box and lifted out a few frames. There are larvae and the beginning of the ovoid structure of brood, then pollen, then honey. The pollen patty has had little activity, but I left it in just in case they need it. After hiving a package, the population of the colony declines for the first 21 days as the queen lays and workers go out seeking pollen, many of whom will die. After the brood begins to hatch and the nectar flow begins in earnest, the population will ramp up. When 80% of the frames have brood, I’ll add another hive box on this colony. Both colony 2 and colony 3 have the same task this year, build a strong parent colony, three hive boxes, that will over winter and divide next May.
Colony 1, if all things go well, should produce honey this year. Next year and from then on, again assuming things go well, we’ll always have two parent colonies producing honey and two child colonies in the process of becoming parents.
Under any circumstances I go the Minnesota Hobby Beekeeper Association meeting on Tuesday, May 11th, and found what those pancake things are. Until the next entry in the bee diary.


 keep it working for the 30-45 minutes I need to do my inspections and whatever work I need to do. I now use hamster
 bedding to start the fire, throw in some compressed wood pellets, pumping the bellows to create a flame and embers. Then I put in smoker fuel, a cotton product that I assume is leftover material from spinning cotton into thread. Once this has established itself I put on the suit, zip up the headpiece, cinch up the sleeves and put my pants into my socks. I learned this last one the hard way when that bee crawled up my pant leg and stung me on the butt.